
使用 Python 掌握機器學習:基礎與關鍵概念
 瀏覽:480
In today's era of Artificial Intelligence (AI), scaling businesses and streamlining workflows has never been easier or more accessible. AI and machine learning equip companies to make informed decisions, giving them a superpower to predict the future with just a few lines of code. Before taking a significant risk, wouldn't knowing if it's worth it be beneficial? Have you ever wondered how these AIs and machine learning models are trained to make such precise predictions?
In this article, we will explore, hands-on, how to create a machine-learning model that can make predictions from our input data. Join me on this journey as we delve into these principles together.
This is the first part of a series on mastering machine learning, focusing on the foundations and key concepts. In the second part, we will dive deeper into advanced techniques and real-world applications.
Introduction:
Machine Learning (ML) essentially means training a model to solve problems. It involves feeding large amounts of data (input-data) to a model, enabling it to learn and discover patterns from the data. Interestingly, the model's accuracy depends solely on the quantity and quality of data it is fed.
Machine learning extends beyond making predictions for enterprises; it powers innovations like self-driving cars, robotics, and much more. With continuous advancements in ML, there's no telling what incredible achievements lie ahead - it's simply amazing, right?
There's no contest as to why Python remains one of the most sought-after programming languages for machine learning. Its vast libraries, such as Scikit-Learn and Pandas, and its easy-to-read syntax make it ideal for ML tasks. Python offers a simplified and well-structured environment that allows developers to maximize their potential. As an open-source programming language, it benefits from contributions worldwide, making it even more suitable and advantageous for data science and machine learning.
Fundamentals Of Machine Learning
Machine Learning (ML) is a vast and complex field that requires years of continuous learning and practice. While it's impossible to cover everything in this article, let's look into some important fundamentals of machine learning, specifically:
- Supervised Machine Learning From its name, we can deduce that supervised machine learning involves some form of monitoring or structure. It entails mapping one function to another; that is, providing labeled data input (i) to the machine, explaining what should be done (algorithms), and waiting for its output (j). Through this mapping, the machine learns to predict the output (j) whenever an input (i) is fed into it. The result will always remain output (j). Supervised ML can further be classified into:
Regression: When a variable input (i) is supplied as data to train a machine, it produces a continuous numerical output (j). For example, a regression algorithm can be used to predict the price of an item based on its size and other features.
Classification: This algorithm makes predictions based on grouping by determining certain attributes that make up the group. For example, predicting whether a product review is positive, negative, or neutral.
- Unsupervised Machine Learning Unsupervised Machine Learning tackles unlabeled or unmonitored data. Unlike supervised learning, where models are trained on labeled data, unsupervised learning algorithms identify patterns and relationships in data without prior knowledge of the outcomes. For example, grouping customers based on their purchasing behavior.
Setting Up Your Environment
When setting up your environment to create your first model, it's essential to understand some basic steps in ML and familiarize yourself with the libraries and tools we will explore in this article.
Steps in Machine Learning:
- Import the Data: Gather the data you need for your analysis.
- Clean the Data: Ensure your data is in good and complete shape by handling missing values and correcting inconsistencies.
- Split the Data: Divide the data into training and test sets.
- Create a Model: Choose your preferred algorithm to analyze the data and build your model.
- Train the Model: Use the training set to teach your model.
- Make Predictions: Use the test set to make predictions with your trained model.
- Evaluate and Improve: Assess the model's performance and refine it based on the outputs.
Common Libraries and Tools:
NumPy: Known for providing multidimensional arrays, NumPy is fundamental for numerical computations.
Pandas: A data analysis library that offers data frames (two-dimensional data structures similar to Excel spreadsheets) with rows and columns.
Matplotlib: Matplotlib is a two-dimensional plotting library for creating graphs and plots.
Scikit-Learn: The most popular machine learning library, providing all common algorithms like decision trees, neural networks, and more.
Recommended Development Environment:
Standard IDEs such as VS Code or terminals may not be ideal when creating a model due to the difficulty in inspecting data while writing code. For our learning purposes, the recommended environment is Jupyter Notebook, which provides an interactive platform to write and execute code, visualize data, and document the process simultaneously.
Step-by-Step Setup:
Download Anaconda:
Anaconda is a popular distribution of Python and R for scientific computing and data science. It includes the Jupyter Notebook and other essential tools.
Download Anaconda from this link.
Install Anaconda:
Follow the installation instructions based on your operating system (Windows, macOS, or Linux).
After the installation is complete, you will have access to the Anaconda Navigator, which is a graphical interface for managing your Anaconda packages, environments, and notebooks.
Launching Jupyter Notebook:

Open the Anaconda Navigator
In the Navigator, click on the "Environments" tab.
Select the "base (root)" environment, and then click "Open with Terminal" or "Open Terminal" (the exact wording may vary depending on the OS).
In the terminal window that opens, type the command jupyter notebook and press Enter.
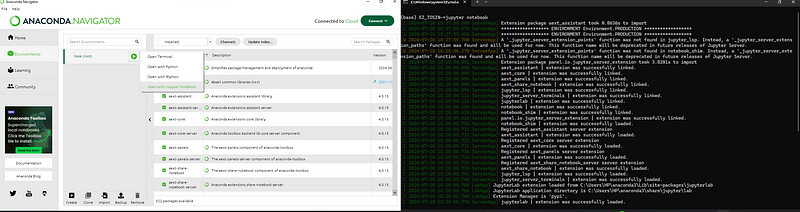
This command will launch the Jupyter Notebook server and automatically open a new tab in your default web browser, displaying the Jupyter Notebook interface.
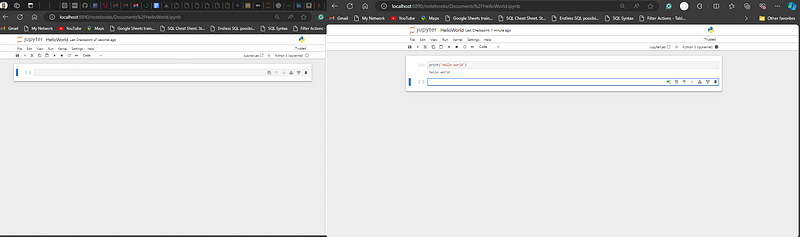
Using Jupyter Notebook:
The browser window will show a file directory where you can navigate to your project folder or create new notebooks.
Click "New" and select "Python 3" (or the appropriate kernel) to create a new Jupyter Notebook.
You can now start writing and executing your code in the cells of the notebook. The interface allows you to document your code, visualize data, and explore datasets interactively.
Building Your First Machine Learning Model
In building your first model, we have to take cognizance of the steps in Machine Learning as discussed earlier, which are:
- Import the Data
- Clean the Data
- Split the Data
- Create a Model
- Train the Model
- Make Predictions
- Evaluate and Improve
Now, let's assume a scenario involving an online bookstore where users sign up and provide their necessary information such as name, age, and gender. Based on their profile, we aim to recommend various books they are likely to buy and build a model that helps boost sales.
First, we need to feed the model with sample data from existing users. The model will learn patterns from this data to make predictions. When a new user signs up, we can tell the model, "Hey, we have a new user with this profile. What kind of book are they likely to be interested in?" The model will then recommend, for instance, a history or a romance novel, and based on that, we can make personalized suggestions to the user.
Let's break down the process step-by-step:
- Import the Data: Load the dataset containing user profiles and their book preferences.
- Clean the Data: Handle missing values, correct inconsistencies, and prepare the data for analysis.
- Split the Data: Divide the dataset into training and testing sets to evaluate the model's performance.
- Create a Model: Choose a suitable machine learning algorithm to build the recommendation model.
- Train the Model: Train the model using the training data to learn the patterns and relationships within the data.
- Make Predictions: Use the trained model to predict book preferences for new users based on their profiles.
- Evaluate and Improve: Assess the model's accuracy using the testing data and refine it to improve its performance.
By following these steps, you will be able to build a machine-learning model that effectively recommends books to users, enhancing their experience and boosting sales for the online bookstore. You can gain access to the datasets used in this tutorial here.
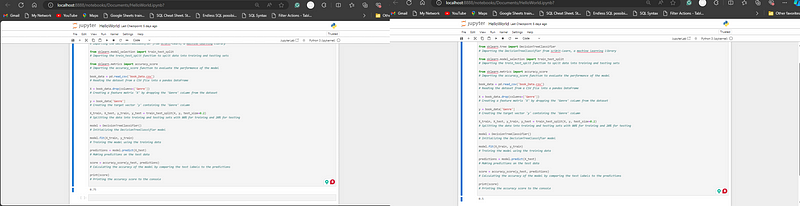
Let's walk through a sample code snippet to illustrate the process of testing the accuracy of the model:
- Import the necessary libraries:
import pandas as pd
from sklearn.tree import DecisionTreeClassifier
from sklearn.model_selection import train_test_split
from sklearn.metrics import accuracy_score
We start by importing the essential libraries. pandas is used for data manipulation and analysis, while DecisionTreeClassifier, train_test_split, and accuracy_score are from Scikit-learn, a popular machine learning library.
- Load the dataset:
book_data = pd.read_csv('book_Data.csv')
Read the dataset from a `CSV file` into a pandas DataFrame.
- Prepare the data:
X = book_data.drop(columns=['Genre'])
y = book_data['Genre']
Create a feature matrix X by dropping the 'Genre' column from the dataset and a target vector y containing the 'Genre' column.
- Split the data:
X_train, X_test, y_train, y_test = train_test_split(X, y, test_size=0.2)
Split the data into training and testing sets with 80% for training and 20% for testing.
- Initialize and train the model:
model = DecisionTreeClassifier()
model.fit(X_train, y_train)
Initialize the DecisionTreeClassifier model and train it using the training data.
- Make predictions and evaluate the model:
predictions = model.predict(X_test)
score = accuracy_score(y_test, predictions)
print(score)
Make predictions on the test data and calculate the accuracy of the model by comparing the test labels to the predictions. Finally, print the accuracy score to the console.
In this example, we start by importing the essential libraries. Pandas is used for data manipulation and analysis, while DecisionTreeClassifier, train_test_split, and accuracy_score are from Scikit-learn, a popular machine learning library. We then read the dataset from a CSV file into a pandas DataFrame, prepare the data by creating a feature matrix X and a target vector y, split the data into training and testing sets, initialize and train the DecisionTreeClassifier model, make predictions on the test data, and calculate the accuracy of the model by comparing the test labels to the predictions.
Depending on the data you're using, the results will vary. For instance, in the output below, the accuracy score displayed is 0.7, but it may show 0.5 when the code is run again with a different dataset. The accuracy score will vary, a higher score indicates a more accurate model.
Output:
Data Preprocessing:
Now that you've successfully created your model, it's important to note that the kind of data used to train your model is crucial to the accuracy and reliability of your predictions. In Mastering Data Analysis: Unveiling the Power of Fairness and Bias in Information, I discussed extensively the importance of data cleaning and ensuring data fairness. Depending on what you intend to do with your model, it is essential to consider if your data is fair and free of any bias. Data cleaning is a very vital part of machine learning, ensuring that your model is trained on accurate, unbiased data. Some of these ethical considerations are:
Removing Outliers: Ensure that the data does not contain extreme values that could skew the model's predictions.
Handling Missing Values: Address any missing data points to avoid inaccurate predictions.
Standardizing Data: Make sure the data is in a consistent format, allowing the model to interpret it correctly.
Balancing the Dataset: Ensure that your dataset represents all categories fairly to avoid bias in predictions.
Ensuring Data Fairness: Check for any biases in your data that could lead to unfair predictions and take steps to mitigate them.
By addressing these ethical considerations, you ensure that your model is not only accurate but also fair and reliable, providing meaningful predictions.
Conclusion:
Machine learning is a powerful tool that can transform data into valuable insights and predictions. In this article, we explored the fundamentals of machine learning, focusing on supervised and unsupervised learning, and demonstrated how to set up your environment and build a simple machine learning model using Python and its libraries. By following these steps and experimenting with different algorithms and datasets, you can unlock the potential of machine learning to solve complex problems and make data-driven decisions.
In the next part of this series, we will dive deeper into advanced techniques and real-world applications of machine learning, exploring topics such as feature engineering, model evaluation, and optimization. Stay tuned for more insights and practical examples to enhance your machine-learning journey.
Additional Resources:
Programming with Mosh
Machine Learning Tutorial geeksforgeeks
-
 左連接為何在右表WHERE子句過濾時像內連接?左JOIN CONUNDRUM:WITCHING小時在數據庫Wizard的領域中變成內在的加入很有趣,當將c.foobar條件放置在上面的Where子句中時,據說左聯接似乎會轉換為內部連接。僅當滿足A.Foo和C.Foobar標準時,才會返回結果。 為什麼要變形?關鍵在於其中的子句。當左聯接的右側...程式設計 發佈於2025-07-08
 -
Spark DataFrame添加常量列的妙招在Spark Dataframe ,將常數列添加到Spark DataFrame,該列具有適用於所有行的任意值的Spark DataFrame,可以通過多種方式實現。使用文字值(SPARK 1.3)在嘗試提供直接值時,用於此問題時,旨在為此目的的column方法可能會導致錯誤。 df.withCo...程式設計 發佈於2025-07-08
-
您如何在Laravel Blade模板中定義變量?在Laravel Blade模板中使用Elegance 在blade模板中如何分配變量對於存儲以後使用的數據至關重要。在使用“ {{}}”分配變量的同時,它可能並不總是最優雅的解決方案。 幸運的是,Blade通過@php Directive提供了更優雅的方法: $ old_section =...程式設計 發佈於2025-07-08
-
為什麼PYTZ最初顯示出意外的時區偏移?與pytz 最初從pytz獲得特定的偏移。例如,亞洲/hong_kong最初顯示一個七個小時37分鐘的偏移: 差異源利用本地化將時區分配給日期,使用了適當的時區名稱和偏移量。但是,直接使用DateTime構造器分配時區不允許進行正確的調整。 example pytz.timezone(&#...程式設計 發佈於2025-07-08
-
如何使用不同數量列的聯合數據庫表?合併列數不同的表 當嘗試合併列數不同的數據庫表時,可能會遇到挑戰。一種直接的方法是在列數較少的表中,為缺失的列追加空值。 例如,考慮兩個表,表 A 和表 B,其中表 A 的列數多於表 B。為了合併這些表,同時處理表 B 中缺失的列,請按照以下步驟操作: 確定表 B 中缺失的列,並將它們添加到表的...程式設計 發佈於2025-07-08
-
為什麼不使用CSS`content'屬性顯示圖像?在Firefox extemers屬性為某些圖像很大,&& && && &&華倍華倍[華氏華倍華氏度]很少見,卻是某些瀏覽屬性很少,尤其是特定於Firefox的某些瀏覽器未能在使用內容屬性引用時未能顯示圖像的情況。這可以在提供的CSS類中看到:。 googlepic { 內容:url(&...程式設計 發佈於2025-07-08
-
編譯器報錯“usr/bin/ld: cannot find -l”解決方法錯誤:“ usr/bin/ld:找不到-l “ 此錯誤表明鏈接器在鏈接您的可執行文件時無法找到指定的庫。為了解決此問題,我們將深入研究如何指定庫路徑並將鏈接引導到正確位置的詳細信息。 添加庫搜索路徑的一個可能的原因是,此錯誤是您的makefile中缺少庫搜索路徑。要解決它,您可以在鏈接器命令中添...程式設計 發佈於2025-07-08
-
Python讀取CSV文件UnicodeDecodeError終極解決方法在試圖使用已內置的CSV模塊讀取Python中時,CSV文件中的Unicode Decode Decode Decode Decode decode Error讀取,您可能會遇到錯誤的錯誤:無法解碼字節 在位置2-3中:截斷\ uxxxxxxxx逃脫當CSV文件包含特殊字符或Unicode的路徑逃...程式設計 發佈於2025-07-08
-
如何在鼠標單擊時編程選擇DIV中的所有文本?在鼠標上選擇div文本單擊帶有文本內容,用戶如何使用單個鼠標單擊單擊div中的整個文本?這允許用戶輕鬆拖放所選的文本或直接複製它。 在單個鼠標上單擊的div元素中選擇文本,您可以使用以下Javascript函數: function selecttext(canduterid){ if(d...程式設計 發佈於2025-07-08
-
Go語言垃圾回收如何處理切片內存?Garbage Collection in Go Slices: A Detailed AnalysisIn Go, a slice is a dynamic array that references an underlying array.使用切片時,了解垃圾收集行為至關重要,以避免潛在的內存洩...程式設計 發佈於2025-07-08
-
在Python中如何創建動態變量?在Python 中,動態創建變量的功能可以是一種強大的工具,尤其是在使用複雜的數據結構或算法時,Dynamic Variable Creation的動態變量創建。 Python提供了幾種創造性的方法來實現這一目標。 利用dictionaries 一種有效的方法是利用字典。字典允許您動態創建密鑰並...程式設計 發佈於2025-07-08
-
-
如何將PANDAS DataFrame列轉換為DateTime格式並按日期過濾?Transform Pandas DataFrame Column to DateTime FormatScenario:Data within a Pandas DataFrame often exists in various formats, including strings.使用時間數據時...程式設計 發佈於2025-07-08
-
您可以使用CSS在Chrome和Firefox中染色控制台輸出嗎?在javascript console 中顯示顏色是可以使用chrome的控制台顯示彩色文本,例如紅色的redors,for for for for錯誤消息? 回答是的,可以使用CSS將顏色添加到Chrome和Firefox中的控制台顯示的消息(版本31或更高版本)中。要實現這一目標,請使用以下...程式設計 發佈於2025-07-08


學習中文
- 1 走路用中文怎麼說? 走路中文發音,走路中文學習
- 2 坐飛機用中文怎麼說? 坐飞机中文發音,坐飞机中文學習
- 3 坐火車用中文怎麼說? 坐火车中文發音,坐火车中文學習
- 4 坐車用中文怎麼說? 坐车中文發音,坐车中文學習
- 5 開車用中文怎麼說? 开车中文發音,开车中文學習
- 6 游泳用中文怎麼說? 游泳中文發音,游泳中文學習
- 7 騎自行車用中文怎麼說? 骑自行车中文發音,骑自行车中文學習
- 8 你好用中文怎麼說? 你好中文發音,你好中文學習
- 9 謝謝用中文怎麼說? 谢谢中文發音,谢谢中文學習
- 10 How to say goodbye in Chinese? 再见Chinese pronunciation, 再见Chinese learning


